Aurora Visio Studio TOP » Program Examples » Rim Identification (Gocator)
Rim Identification (Gocator)
目的
The task is to classify different rims.
Input
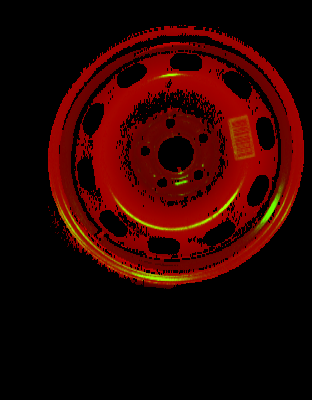
Images of rims from Gocator.
Output
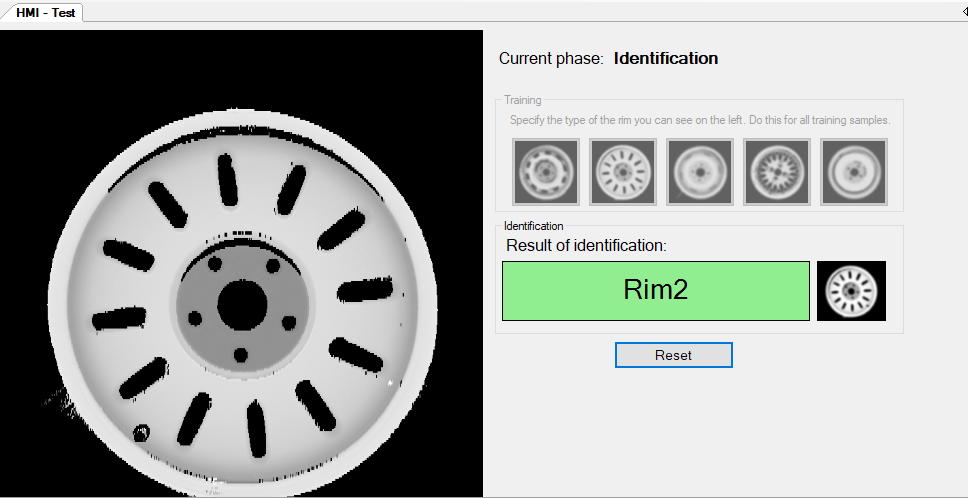
The name of the class to which the rim belongs.
ヒント
For the object classification you can use SVM method.
In images from Gocator the height map and intensity image are stored in the red and green channel respectively. You can use the SplitChannels to separate the data.
The information about HMI controls are available in this article.
Solution (AVS)
Prepare data for SVM training and train models.
-
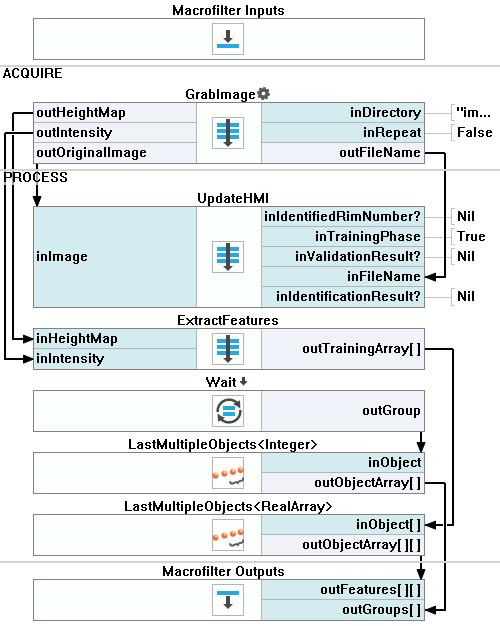
In the Project Explorer window cerate a new Task, name it DoTraining and add to the Process section of the Main macrofilter. Go inside the Task.
-
In the Project Explorer window cerate a new Step, name it GrabImage and add to the Acquire section of the Task. Go inside the Step.
-
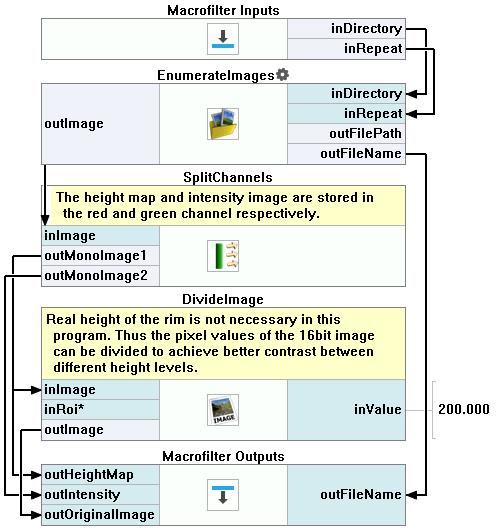
Add the EnumerateImages filter. Drag its inDirectory and inRepeat inputs to the Macrofilter Inputs section, Leave default names.
-
Add the SplitChannels filter to separate the height map and the intensity image. Connect the inImage input with the outImage from the previous filter.
-
Real height of the rim is not necessary in this program. Thus the pixel values of the 16bit image can be divided to achieve better contrast between different height levels. Add the DivideImage filter. Connect its inImage input to the outMonoImage1 out of the previous filter. Set the inValue to 200.
-
Connect the outMonoImage1, the outMonoImage2, the outImage from the DivideImage and the outFileName from the EnumerateImages to the Macrofilter Outputs. Name the new outputs: outHeightMap, outIntensity, outOriginalImage and outFileName.
-
Return to the DoTraining macrofilter.
-
Set the catalog with the training images as the inDirectory input of the GrabImage Step. Set the inRepeat input of the GrabImage to False.
-
In the Project Explorer window cerate a new Step, name it UpdateHMI and add to the Process section of the DoTraining Task. Create inputs of the new Step:
-
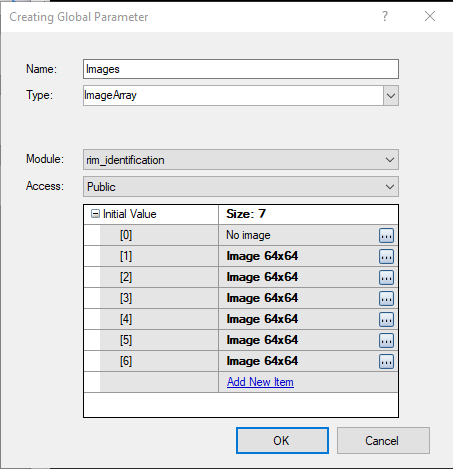
In the Project Explorer window cerate a new Global Parameter of the ImageArray type and name it Images. Set the initial value as shown on the picture below:
-
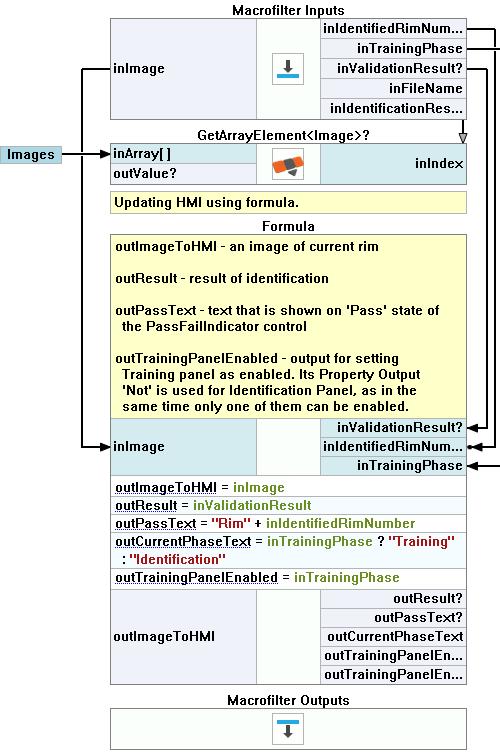
Connect the UpdateHMI inImage to the GrabImage outOriginalImage and the UpdateHMI inFileName to the GrabImage outFileName. Inside the UpdateHMI:
- Add the GetArrayElement. Connect its inArray to the Images Parameter and the inIndex to the macrofilter's inIdentificationResult input.
- To update HMI you can use the formula.
- Drag the inImage, the inIdentifiedRimNumber, the inTrainingPhase and the inValidationResult Macrofilter Inputs to the Formula, leave default names of the new inputs.
outImageToHMI = inImage
outResult = inValidationResult
outPassText = "Rim" + inIdentifiedRimNumber
outCurrentPhaseText = inTrainingPhase ? "Training" : "Identification"
outTrainingPanelEnabled = inTrainingPhase - The outImageToHMI is an image of a current rim, the outResult is the result of the identification, the outPassText is the text that is shown on 'Pass' state of the PassFailIndicator HMI control, the outTrainingPanelEnabled is the output for setting the Training panel as enabled. Its Property Output Not is used for the Identification Panel, as in the same time only one of them can be enabled.
- Drag the inImage, the inIdentifiedRimNumber, the inTrainingPhase and the inValidationResult Macrofilter Inputs to the Formula, leave default names of the new inputs.
-
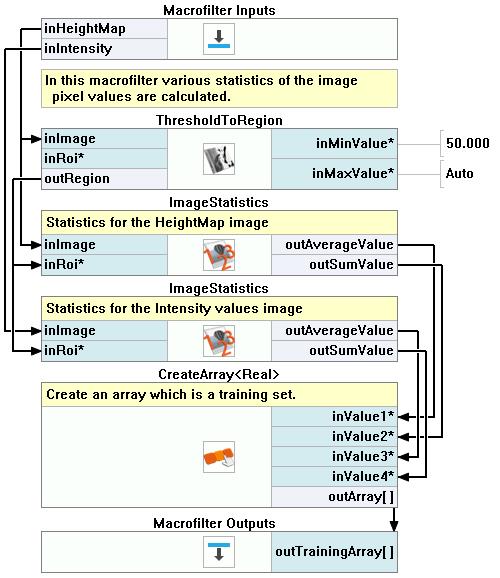
Return to the DoTraining macrofilter. In the Project Explorer window cerate a new Step, name it ExtractFeatures and add to the Process section of the DoTraining Task. In this macrofilter various statistics of the image pixel values will be calculated.
- Connect the outHeightMap and the outIntensity from the GrabImage to the ExtractFeatures, leave default names of the inputs.
- Inside the ExtractFeatures:
- Add the ThresholdToRegion filter and connect its inImage input to the inHeightMap macrofilter input. Set the inMinValue to 50.
- Add 2 ImageStatistics filters. Connect the first inImage to the inHeightMap and the second to the inIntensity. For both filters connect the inRoi to the outRegion of the previous filter.
- Add the CreateArray filter to create a training set. Connect items to its inputs in the following order: the first outAverageValue, the first outSumValue, the second outAverageValue, the second outSumValue. Drag the outArray to the Macrofilter Outputs section. Name the new output outTrainingArray.
-
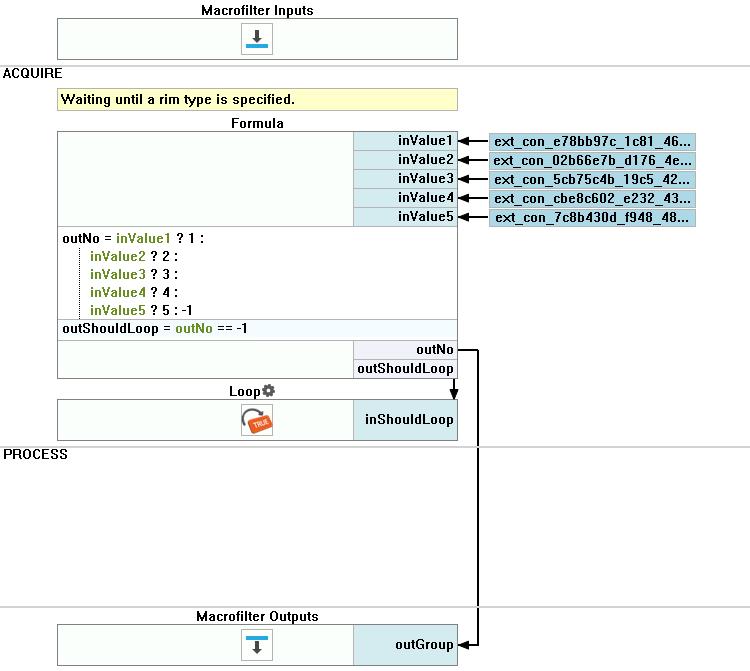
Add waiting until a rim type is specified. Return to the DoTraining macrofilter. In the Project Explorer window cerate a new Task, name it Wait and add to the Process section of the DoTraining Task. Go inside the new Task.
-
Add the formula. Create 5 inputs with the Bool data type, leave default names of the inputs.
outNo = inValue1 ? 1 : inValue2 ? 2 : inValue3 ? 3 : inValue4 ? 4 : inValue5 ? 5 : -1
outShouldLoop = outNo == -1 -
Drag the outNo output to the Macrofilter Outputs section, name the new output outGroup.
- Add the Loop filter, connect its inShouldLoop input to the outShouldLoop output from the previous filter.
-
-
Return to the DoTraining macrofilter. Add 2 LastMultipleObjects filters to the Process section.
- For the fist one connect the inObject input to the outGroup output from the previous filter. Drag its output to the Macrofilter Outputs section. Name the new output outGroups.
- For the second one connect the inObject input to the ExtractFeatures outTrainingArray output. Drag its output to the Macrofilter Outputs section. Name the new output outFeatures.
-
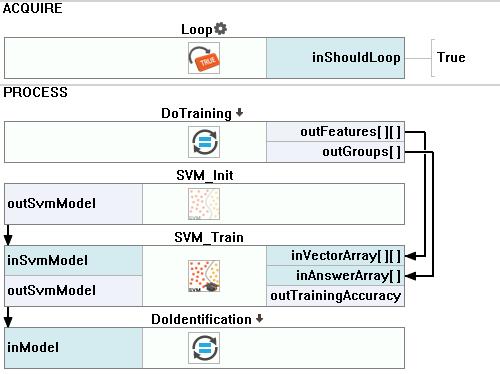
Return to the Main macrofilter. Add the SVM_Init filter to the Process section. Set its properties:
- The inKernelGammaScale to 0.
- The inRegularizationConstant to 1.327.
- The inNu to 0.006.
- The inStoppingEpsilon to 0.01.
- The inUseShrinkingHeuristics to False.
-
Add the SVM_Train filter:
- Connect the inSvmModel to the outSvmModel output of the previous filter.
- Connect the inVectorArray to the outFeatures output from the DoTraining Task.
- Connect the inAnswerArray to the outGroups output from the DoTraining Task.
Prepare inspection part.
-
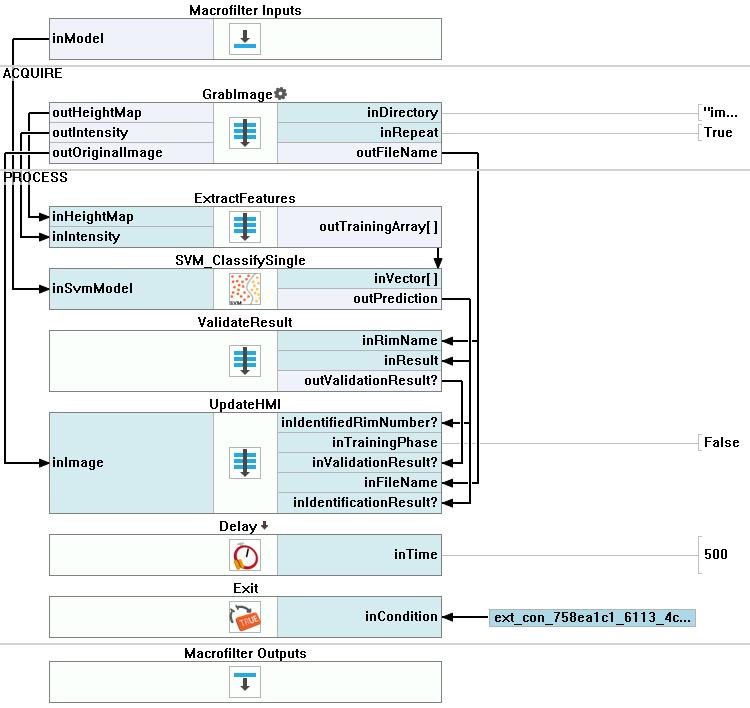
In the Project Explorer window cerate a new Task, name it DoIdentification and add to the Process section of the Main macrofilter. Drag the SVM_Train outSvmModel output to the new macrofilter and name the input inModel. Go inside the macrofilter.
-
From the Project Explorer window drag the GrabImage Step to the Acquire section.
- Set the inDirectory input to the catalog with the test images.
- Set the inRepeat input to True.
-
From the Project Explorer window drag the ExtractFeatures Step to the Process section. Connect its inputs to the adequate outputs of the previous step.
-
Add the SVM_ClassifySingle filter to classify an object from the input image.
- Connect the inSvmModel to the inModel from the Macrofilter Inputs section.
- Connect the inVector to the outTrainingArray output of the ExtractFeatures step.
-
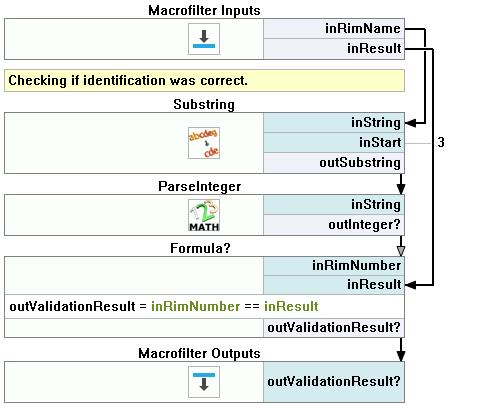
Compare the predictions with the file name. In the Project Explorer window cerate a new Step, name it ValidateResult and add to the Process section of the DoIdentification macrofilter.
- Drag the outFileName output from GrabImage step to the new Step, name the new input inRimName.
- Drag the outPrediction from the previous filter to the new step, name the input inResult.
-
Inside the ValidateResult:
- Get the correct model number. Add the Substring filter. Connect its inString input to the inRimName macrofilter input. Set the inStart to 3 and the inLength to 1.
- Add the ParseInteger filter. connect the inString input to the Substring output.
- Compare the predicted model with the one form the Substring. Add the formula. Drag the ParseInteger output and name the new input inRimNumber, and the inResult from the Macrofilter Inputs, leave the default name. >Formula: outValidationResult = inRimNumber == inResult*
- Connect the formula output to the Macrofilter Outputs section, leave the default name.
-
Go back to the DoIdentification macrofilter. From the Project Explorer window drag the UpdateHMI Step to the Process section.
- Connect the inImage input to the outOriginalImage output from the GrabImage.
- Connect the inIdentifiedRimNumber input to the outPrediction output from the SVM_ClassifySingle.
- Set the inTrainingPhase input to True.
- Connect the inValidationResult input with the output from the previous filter.
- Connect the inFileName input to the outFileName output from the GrabImage.
- Connect the inIdentificationResult to the outPrediction from the SVM_ClassifySingle filter.
-
Add the Delay filter. Set the inTime to 500 to let the user see the results.
-
Add the Exit filter.
Prepare HMI.
-
Add the VideoBox control to the top left HMI corner. Go to the UpdateHMI Step. Connect the outImageToHMI output from the formula to the VideoBox inImage input. In the Properties window:
- Set the BackColor to Black.
- Set the SizeMode Zoom.
- Adapt its size to the HMI Panel Size.
-
Add 2 Label controls in the top right corner next to each other.
- Set the Text value of the first one to Current phase: .
- Connect the second one's inText input to the outCurrentPhaseText output of the formula from the UpdateHMI Step.
-
Add the Group Box below the Label controls.
- Set its Text to Training.
- The control should be big enough to contain 5 thumbnails and a label.
-
Inside the Training box add the Label control. In the Properties window:
- Set its Text value to Specify the type of the rim you can see on the left. Do this for all training samples. .
- Set its ForeColor to MediumBlue.
-
Inside the Training box add 5 ImpulseButton controls.
- For each one in the Properties window set the BackgroundImage to one of the images from the Icons catalog.
- Connect each one's output to the adequate input of the formula inside the Wait Task.
-
Add the Group Box below the Training box.
- The control should have similar size to the Training box.
- Set the Text value to the Identification.
- Add the Label control inside the new box. Set its Text to Result of identification:.
- Add the PassFailIndicator control inside the box.
- Connects its inEnabled input to the outTrainingPanelEnable.Not output from the the formula inside the UpdateHMI Step.
- Connect its inPassText input to the outPassText output from the the formula inside the UpdateHMI Step.
- Connect its inValue input to the outResult output from the the formula inside the UpdateHMI Step.
- Add the VideoBox control next to the PassFailIndicator control. Connect its inInput to the outValue output of the GetArrayElement filter inside the UpdateHMI Step.
- Set its BackColor to Black*.
- Set the SizeMode to Zoom.
-
Add the ImpulseButton control below the Identification box. Connect its output to the inCondition input of the Exit filter inside the DoIdentification Task.
マクロフィルタ メイン
Macrofilter DoIdentification.
Macrofilter DoTraining.
Macrofilter ExtractFeatures.
Macrofilter GrabImage.
Macrofilter UpdateHMI.
Macrofilter ValidateResult.
Macrofilter Wait.
その他の資料
- 数式 - 数式の使用に関する詳細情報です。
- HMI Controls - List of HMI controls.
- Image Analysis - List of filters analyzing images.
- 画像処理 - 画像処理に関する包括的な紹介。

